|
|||||||


| Tips and Hints Share Your Experience and Help Others Get That Dream Shot |

 |
|
|
Thread Tools |
Rating: 
|
Display Modes |
|
|||||||
| Tips and Hints Share Your Experience and Help Others Get That Dream Shot |
|
|
|
Thread Tools |
Rating:
|
Display Modes |
|
#2
 25-03-2009, 05:08 AM
|
||||
|
||||
|
I'm interested in both learning how to take a good shot and then photoshop afterwards. I am artistically retarded so please help. Haha.
Particularly still macro shots of lures and also fish shots. Dave
__________________

|
|
#3
25-03-2009, 05:29 AM
|
||||
|
||||
|
The Rule of Thirds.
fig1 One of the most popular 'rules' in photography is the Rule Of Thirds. It is also popular amongst artists. It works like this: Imaginary lines are drawn dividing the image into thirds both horizontally and vertically. You place important elements of your composition where these lines intersect. I've even made a little diagram for you. As well as using the intersections you can arrange areas into bands occupying a third or place things along the imaginary lines. As you can see it is fairly simple to implement. Good places to put things; third of the way up, third of the way in from the left , you get the idea. Duff places to put things; right in the middle, right at the top, right at the bottom, away in the corner. Using the Rule of Thirds helps produce nicely balanced easy on the eye pictures. Also, as you have to position things relative to the edges of the frame it helps get rid of ' tiny subject surrounded by vast empty space' syndrome. One last thing about the Rule of Thirds for the time being. Once you have got the hang of the Rule of Thirds you will very quickly want to break it ! This is fine. As I said earlier these 'rules' are best used as guidelines and if you can create a better image by bending or ignoring rules then fire away. The Rule of Thirds is fairly structured but there are a great many methods you can employ which rely on your ability to 'see' things and incorporate them into your composition. Next up we will look at some, but by no means all, of them. 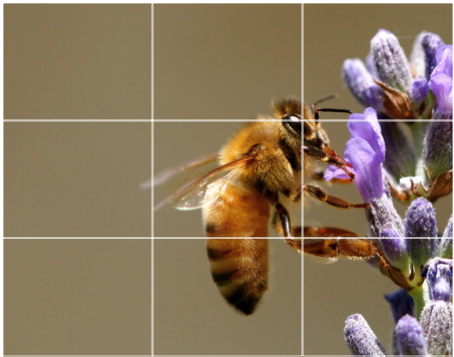 As for macro shots a tripod is a must! A White sheet of paper is always help full! make your self a little light box. Get a cardboard box cut out the sides, tape some white paper over the cut you and add a lamp. Light box  end result 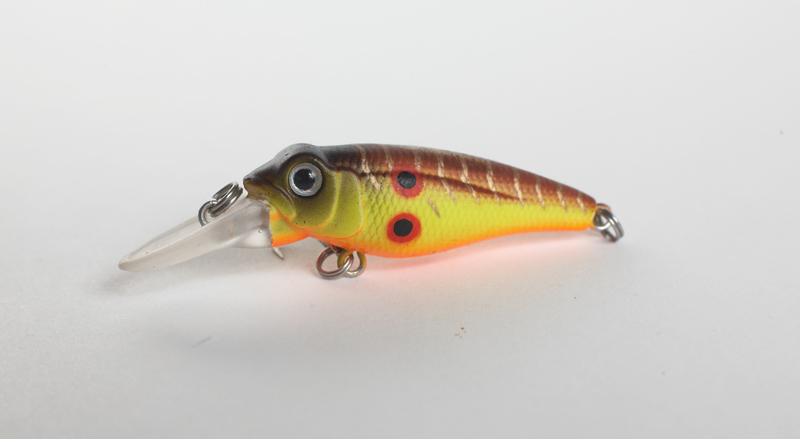
__________________
Cheers Ben
|
|
#4
25-03-2009, 05:40 AM
|
||||
|
||||
|
Thats wicked...thanks for the tips.
The box inparticular will be helpful...now I've just got to find some of those plastic/perspex lure stands. Dave
__________________
|
|
#6
25-03-2009, 05:48 AM
|
||||
|
||||
|
Quote:
It is easy with things that don't move  Still trying to get things up close that fly??
|
|
#7
25-03-2009, 05:50 AM
|
||||
|
||||
|
Quote:
its always fun to try and catch things that fly!!!! As for the course its on here and its free. i can screen shot alot of stuff.
__________________
Cheers Ben
|
|
#8
25-03-2009, 05:51 AM
|
||||
|
||||
|
Quote:
I have a mac with CS3, just so you know what I am working with. Dale.
|
|
#9
25-03-2009, 05:55 AM
|
||||
|
||||
|
Quote:
Ben, have you seen any good tutorials for colour/black&white photos. Eg. Fish is in colour, background is b/w. Have always struggled with that...
|
|
#10
25-03-2009, 05:55 AM
|
||||
|
||||
|
Quote:
we can start with basic levels adjustments, resizing an images, adding a boarder.... anything else?
__________________
Cheers Ben
|
|
#11
25-03-2009, 05:56 AM
|
||||
|
||||
|
Quote:
__________________
Cheers Ben
|
|
#12
25-03-2009, 05:59 AM
|
||||
|
||||
|
Which program do you guys use? The lure pic with the sunset looks sweet!
__________________
PB HB- 39CM 1.00KG BASSDAY VIBE (BLACKWOOD) PB SP- 45CM 1.29KG SQUIDGIE WRIGGLER (ALBANY) PB FLY- 0CM WAITING FOR A 40+ (MISSION ACCOMPLISHED 02/05/08) WAITING FOR A 50+
|
|
#15
25-03-2009, 06:07 AM
|
||||
|
||||
|
Quote:
 that was a fun to shoot. i should do a what light is in the water and how fish see things
__________________
Cheers Ben
|
|
|
|


 Linear Mode

